Are you planning to migrate your WordPress site to a new host? Moving a WordPress installation is straightforward when you prepare a complete backup, set up the new server before changing DNS, restore the files and database, and then test the site before shutting down the old host. The goal is to keep the same content, URLs, media, plugins, theme, settings, and search visibility while minimizing downtime.
Many hosting companies offer migration assistance, but the process and turnaround time vary by provider and plan. If you prefer to do it yourself, this guide walks through a plugin-based migration while keeping the old site available until the new copy has been tested.
If you are the buyer of any hosting plans recommended by WordPress Mafia with our affiliate link, you can also request us to do that.
In this step-by-step tutorial, we will show you how to move a self-hosted WordPress site to another hosting server with UpdraftPlus. The workflow assumes you are keeping the same domain and URLs. If you are also changing the domain, additional URL search-and-replace work is required.
- How to Migrate WordPress Site to a New Host Using UpdraftPlus: Step-by-Step Guide
- Step 1 : Decide New WordPress Host
- Step 2 : Setup UpdraftPlus for Easy Migration
- Step 3 : Add the Domain to New Host
- Step 4 : Install WordPress on New Host
- Step 5 : Change DNS Records (Nameservers or A Records)
- Step 6 : Verify DNS and Log In to WordPress
- Step 7 : Install and Activate UpdraftPlus Plugin
- Step 8 : Authorize UpdraftPlus With the Same Google Account
- Step 9 : Scan Google Drive for Backup Files
- Step 10 : Restore Backup File – Migrate WordPress Site to New Host
- Wrapping Up – How to Migrate WordPress Site to New Host
- Frequently Asked Questions Across the Web Regarding How to Migrate WordPress Site to New Host
- Should I Migrate WordPress Site to New Host Manually or Using Plugins?
- How do I Migrate WordPress Site to New Host Manually?
- Do I Need to Migrate the Domain to New Host Along With the Site?
- How do I Migrate WordPress Site to New Domain?
- Can I Migrate Site From WordPress.com to Self-hosted WordPress?
- Does Changing Website Host Affect SEO?
- How Long Does it Take to Migrate WordPress Site From One Host to Another?
- What is the best way to migrate WordPress site to new host?
How to Migrate WordPress Site to a New Host Using UpdraftPlus: Step-by-Step Guide
In this guide, we will migrate a self-hosted WordPress site to a new hosting server using UpdraftPlus. UpdraftPlus is primarily a backup and restore plugin; its migration workflow can reuse a complete backup on the new server. The exact screens and available migration features can vary by the UpdraftPlus version and whether premium migration features are used.
You can use a similar backup-and-restore workflow with other migration or backup plugins, but their screens and features differ. For the Google Drive backup setup used in this tutorial, see our UpdraftPlus and Google Drive backup guide.
Step 1 : Decide New WordPress Host
The first step is of course, getting a new host. You can buy suitable hosting plan according to size and use of the site. If you are planning to move to new host because the old one is slow and not optimized for WordPress, so it is time to decide a good hosting before you migrate wordpress site to new host.
For fast and reliable shared and WordPress hosting, we recommend Bluehost. Bluehost is also recommended by WordPress.org. The second option can be Hostinger, which also provides a great value for money hosting solution.
For managed hosting, we recommend you to check out WP Engine which is available at competitive price. If your site is expanding and getting more reach and visitors, you can definitely give a try to Kinsta. Kinsta seems a bit expensive, but worth it for its performance and support.
Step 2 : Setup UpdraftPlus for Easy Migration
We are going to migrate WordPress site to new host using a backup plugin. That means we will need a plugin that is either made specially for backup or one which contains whole site files and database.
UpdraftPlus can back up your WordPress files and database to remote storage, including Google Drive. Availability of individual remote-storage and migration features can depend on the current plugin version and plan, so check the plugin’s current settings before starting. For this guide, Google Drive is used as the remote backup location.

To setup this plugin, just follow the following simple steps.
- Install UpdraftPlus from plugin section,
- Activate the plugin,
- Enable backup for everything on your site from settings option for UpdraftPlus,
- Authorize access to Google drive,
- Create a Backup,
If you are not sure about the setup process, you can simply check our guide on how to backup wordpress site on Google drive.
Step 3 : Add the Domain to New Host
If your domain is not already added to you new hosting, it is time to add it. If the domain is already added while buying hosting you can ignore this step.
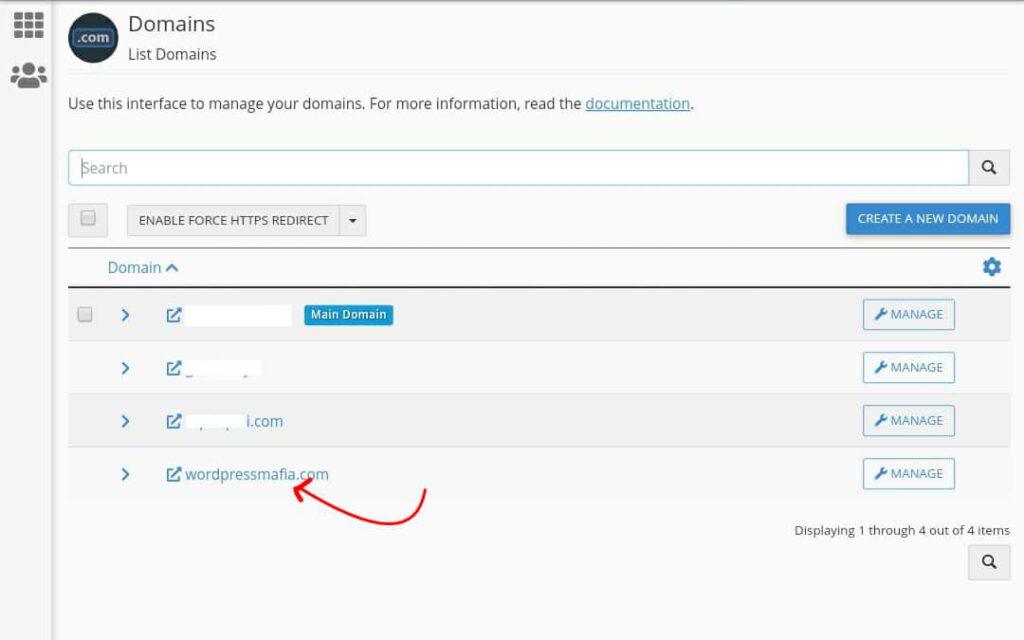
In this step, we do not recommend to make any changes to your DNS records (such as nameservers and A record). To minimize the down time, we will do this later.
Step 4 : Install WordPress on New Host
Open your new server and install a fresh WordPress on your domain. You can install WordPress either using auto installer or you can also install WordPress manually.
This installation does not require any changes in terms of name, tagline, user, database, etc. It will get replaced by one which is currently bing backup on Google drive on another server.
If your hosting provider gives you a temporary URL, staging URL, preview environment, or another safe way to access the new installation before DNS changes, you can use it to prepare the server first. Otherwise, keep the old site live until the new server is ready and use the DNS cutover only when you are prepared to restore and test.
Step 5 : Change DNS Records (Nameservers or A Records)
Only change DNS after the new hosting account is ready, the destination WordPress installation is prepared, and you have a verified backup that can be restored. If you want to minimize downtime, make the final backup shortly before the DNS cutover.
To change the nameservers, go to your domain registrar’s site and login to your account. Find the nameserver option and change the nameserver to new hosting.
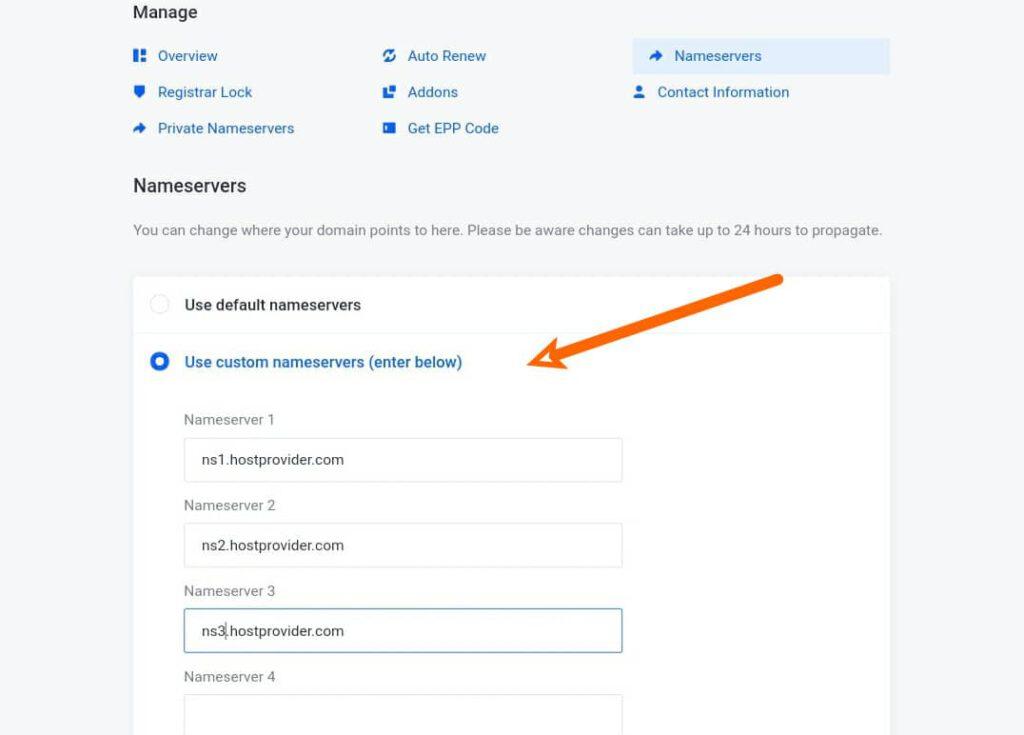
If you manage DNS through a provider such as Cloudflare, update the records required by your new host. An A record points a hostname to an IPv4 address, while a CNAME points a hostname to another hostname. Do not assume that every migration needs the same records: follow the new host’s DNS instructions and preserve any existing records for mail, verification, or other services.
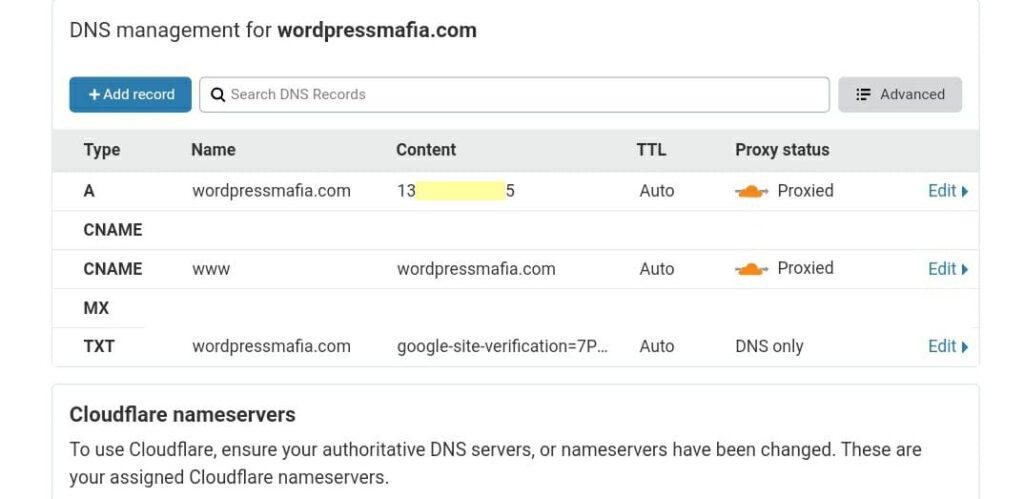
Your server IP can be found on cPanel at the sidebar labelled as Shared IP in case you are using shared hosting.
Step 6 : Verify DNS and Log In to WordPress
DNS changes do not switch every visitor at exactly the same moment. After the domain begins resolving to the new server, verify that you are reaching the new installation before proceeding. If the domain is already pointed at the new server, use the credentials you created there. Do not assume that a new temporary WordPress installation has the same login credentials as the old site.
If you cannot access wp-admin, use the password-reset or recovery options provided by WordPress or your hosting provider. Do not rely on a hosting panel’s one-click login feature unless your host explicitly provides it.
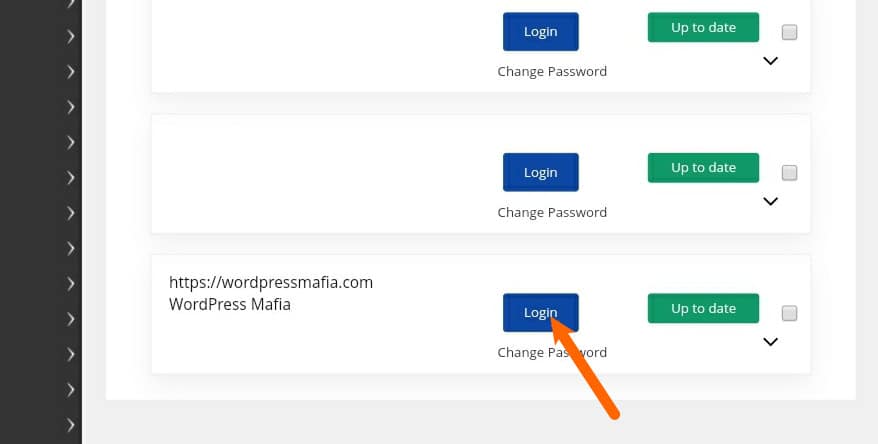
Step 7 : Install and Activate UpdraftPlus Plugin
After logging in to your WordPress dashboard for your new installation, go to plugin option then install and activate the UpdraftPlus plugin.
The fresh WordPress installation is only the destination environment. Before restoration, confirm that the new server meets the site’s requirements and that you have enough disk space and PHP/database resources. The backup should restore the site’s existing files and database; do not delete the old server yet.
Step 8 : Authorize UpdraftPlus With the Same Google Account
If the backup is stored in Google Drive, connect the destination UpdraftPlus installation to the same Google account or remote-storage location that contains the backup. The exact authorization flow can change between plugin versions.
Make sure that you authorized the same Google account which you authorised in your old hosting. You can also authorize another account, but you will need to download the backup file from another and upload them to server manually.
After connecting remote storage, return to the UpdraftPlus Backup/Restore screen. If the destination installation creates a fresh backup you do not need, you can cancel it only if the plugin offers that option; do not cancel an operation that is currently restoring your migration backup.
Step 9 : Scan Google Drive for Backup Files
Use UpdraftPlus’s remote-storage scan/rescan option if available to make the existing backup set visible. If the storage contains backups from multiple sites, identify the correct backup carefully before restoring it.
Alternatively, you can also download the backup files from your Google Drive to local storage and upload all of them to your site using upload backup files option. Whatever option you choose, it is possible to migrate WordPress site to new host using both methods.
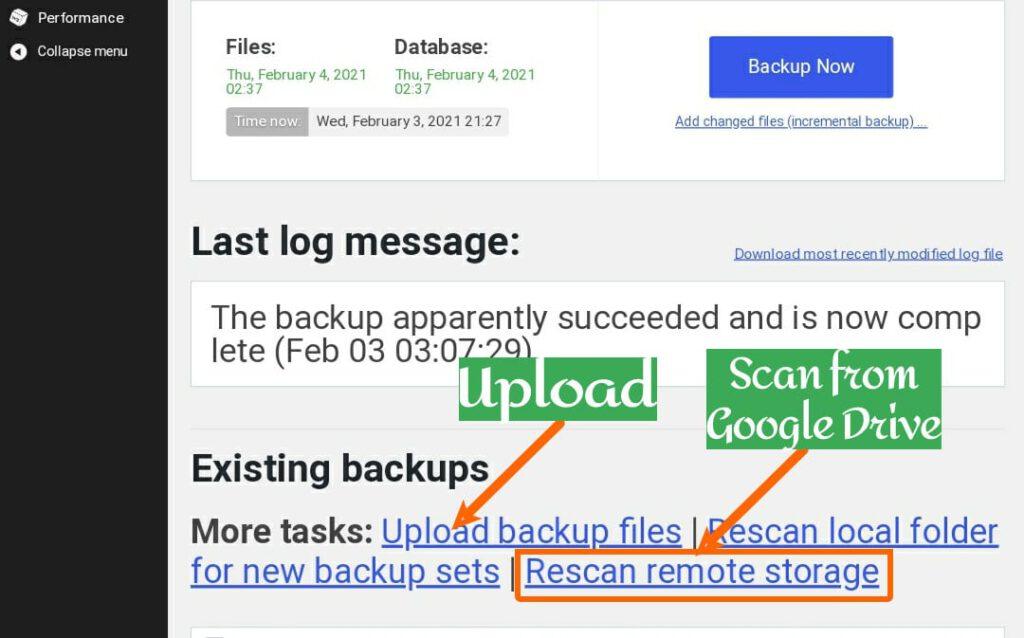
If this contains mixed (multiple sites) backup files, identify the correct one by looking at the time of backup. You can make it sure by checking if the next site was backed up recently.
If you are not sure about it, you can check UpdraftPlus folder inside the google drive and download the recent backup files which contains the site name as file name.
Step 10 : Restore Backup File – Migrate WordPress Site to New Host
After identifying the correct backup set, choose Restore. Before confirming, verify the backup date and the components included in it. A complete migration normally requires the database and the relevant WordPress files, including plugins, themes, and uploads.
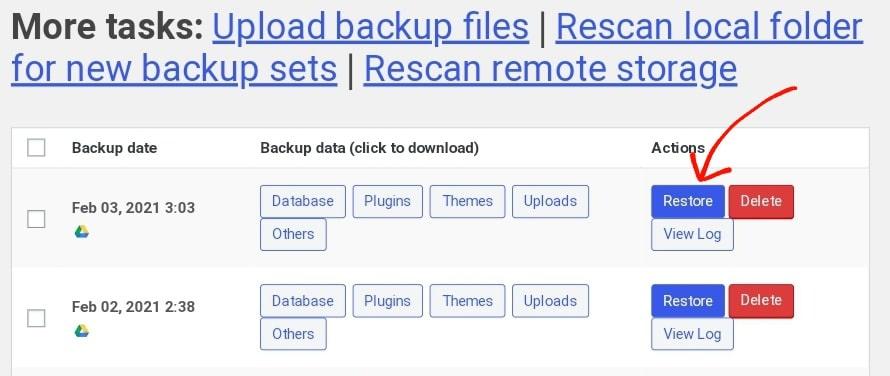
When you click Restore, UpdraftPlus will show the components available in the backup. For a full-site migration, select the components you actually backed up and need to restore, typically plugins, themes, uploads, other files, and the database. Review the restore screen rather than blindly selecting options that are not present in the backup.
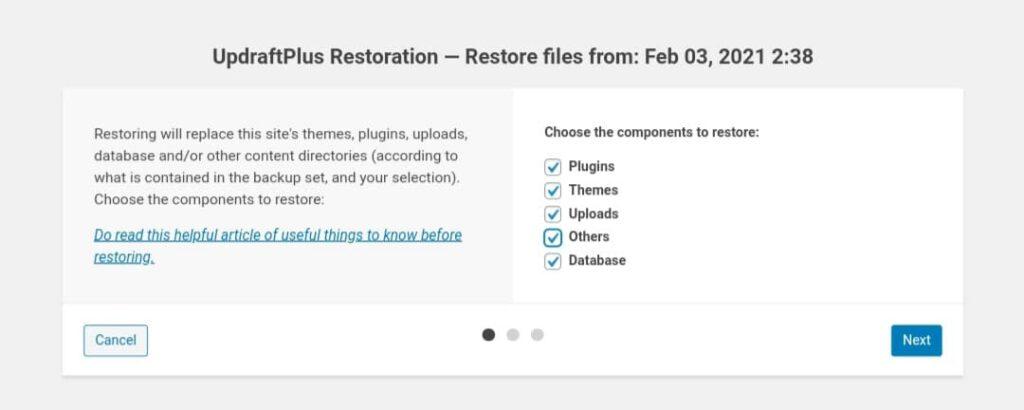
When you proceed further, it will start downloading all the files from Google Drive. If you have uploaded the files instead, this step will get completed very fast.
The download process takes a few minutes to hours depending upon your site size and type of hosting plan (I/O limit), etc.
Once the backup components have been downloaded and the restore completes, test the site and log in with the credentials stored in the restored WordPress database. If the site URL or domain is unchanged, the restored site should use the existing WordPress users and settings. If you changed the domain, additional URL updates may be required.
Do not delete the old hosting copy immediately. First test the front end, wp-admin, permalinks, media, forms, important plugins, SSL/HTTPS, redirects, email-related services, analytics, and critical integrations. Keep the old site available until you are confident the migration is complete.
Wrapping Up – How to Migrate WordPress Site to New Host
After the migration, keep a recoverable copy of the old site and its database until the new server has been fully tested and your normal backup process is working. The exact retention period depends on your risk tolerance, hosting terms, and backup storage.
Kudos! You have successfully migrated your WordPress site to new host.
Frequently Asked Questions Across the Web Regarding How to Migrate WordPress Site to New Host
Should I Migrate WordPress Site to New Host Manually or Using Plugins?
Both approaches can work. A plugin-based migration can simplify the backup and restore process, while a manual migration gives you direct control over the files and database. Downtime depends on the migration method, DNS setup, site size, and how the final cutover is performed.
How do I Migrate WordPress Site to New Host Manually?
A manual migration generally involves backing up the database and WordPress files, creating the database and user on the new host, uploading the files, importing the database, updating wp-config.php with the new database credentials, and then testing the site. If the domain or URL changes, additional URL updates may be required.
Do I Need to Migrate the Domain to New Host Along With the Site?
The domain and hosting are totally different from each other. It is not necessary to have the hosting and the domain from the same seller. You can keep the domain on the existing registrar and only migrate WordPress site to new host.
However, if the domain was purchased together with the hosting, you can transfer the domain to new host for easy management.
How do I Migrate WordPress Site to New Domain?
A domain change is different from a host-only migration. After moving the files and database, you must update the WordPress URLs and safely replace old-domain references in the database where appropriate. Be careful with serialized data and use a migration/search-replace tool designed for WordPress rather than a blanket SQL replacement.
Can I Migrate Site From WordPress.com to Self-hosted WordPress?
Yes, but WordPress.com-to-self-hosted migration is a different workflow from moving one self-hosted installation between hosts. Depending on the WordPress.com plan and site features, you may need to export/import content and separately handle media, theme, plugins, users, redirects, and other settings.
Does Changing Website Host Affect SEO?
Changing hosts does not inherently require a change to your URLs, so a careful host-only migration can preserve search-engine signals. SEO problems can still occur if the site becomes unavailable, HTTPS or redirects break, important files are missing, URLs change without proper redirects, or the new server materially changes performance or crawlability.
How Long Does it Take to Migrate WordPress Site From One Host to Another?
There is no universal migration time. A small site may restore quickly, while a large media library, slow storage, database size, DNS changes, or provider limits can make the process much longer. Plan the migration around enough time to test the new site before retiring the old server.
What is the best way to migrate WordPress site to new host?
The best depends upon the level of knowledge the owner has. Manual method is the best as it can be done with zero downtime.
Migrating the site can best using plugin if you can consider a little bit of downtime.
Discover more from Grisma
Subscribe to get the latest posts sent to your email.