Are you planning to migrate your WordPress site to new host? It is very easy to migrate WordPress site to new host or server. There are multiple reasons why you may be planning to migrate your site to new host. Whatever the motive is, the ultimate goal is to migrate your WordPress site with the same look, preserve all the files and without affecting SEO.
Generally, the hosting companies offer a free website migration service for their customers. But, these services are done on request basis which generally takes a day to week. Instead of waiting you may migrate easily with our tutorial.
If you are the buyer of any hosting plans recommended by WordPress Mafia with our affiliate link, you can also request us to do that.
In this step-by-step tutorial, we will show you how to safely and easily move or migrate WordPress site to new hosting server. And lastly, we will also cover the frequently asked questions on the web regarding site migration which you might also be asking.
- How to Migrate WordPress Site to New Host Using Plugin? A Step-by-Step Guide
- Step 1 : Decide New WordPress Host
- Step 2 : Setup UpdraftPlus for Easy Migration
- Step 3 : Add the Domain to New Host
- Step 4 : Install WordPress on New Host
- Step 5 : Change DNS Records (Nameservers or A Records)
- Step 7 : Login to WordPress
- Step 8 : Install and Activate UpdraftPlus Plugin
- Step 9 : Authorize UpdraftPlus With the Same Google Account
- Step 10 : Scan Google Drive for Backup Files
- Step 11 : Restore Backup File – Migrate WordPress Site to New Host
- Wrapping Up – How to Migrate WordPress Site to New Host
- Frequently Asked Questions Across the Web Regarding How to Migrate WordPress Site to New Host
- Should I Migrate WordPress Site to New Host Manually or Using Plugins?
- How do I Migrate WordPress Site to New Host Manually?
- Do I Need to Migrate the Domain to New Host Along With the Site?
- How do I Migrate WordPress Site to New Domain?
- Can I Migrate Site From WordPress.com to Self-hosted WordPress?
- Does Changing Website Host Affect SEO?
- How Long Does it Take to Migrate WordPress Site From One Host to Another?
- What is the best way to migrate WordPress site to new host?
How to Migrate WordPress Site to New Host Using Plugin? A Step-by-Step Guide
In this guide we will learn to migrate WordPress site to new host using the most popular backup plugins. For this particular guide, we will be using UpdraftPlus, a backup plugin which gets the job done for our requirement.
You can also, apply the same method to migrate your WordPress site to a new host using other similar backup plugins. If you do not want to take a risk, simply setup UpdraftPlus plugin for site backup and follow this guide further.
Step 1 : Decide New WordPress Host
The first step is of course, getting a new host. You can buy suitable hosting plan according to size and use of the site. If you are planning to move to new host because the old one is slow and not optimized for WordPress, so it is time to decide a good hosting before you migrate wordpress site to new host.
For fast and reliable shared and WordPress hosting, we recommend Bluehost. Bluehost is also recommended by WordPress.org. The second option can be Hostinger, which also provides a great value for money hosting solution.
For managed hosting, we recommend you to check out WP Engine which is available at competitive price. If your site is expanding and getting more reach and visitors, you can definitely give a try to Kinsta. Kinsta seems a bit expensive, but worth it for its performance and support.
Step 2 : Setup UpdraftPlus for Easy Migration
We are going to migrate WordPress site to new host using a backup plugin. That means we will need a plugin that is either made specially for backup or one which contains whole site files and database.
UpdraftPlus is a backup plugin which is available for free as well as convenient to use. It backup the files to remote storage (Google Drive on free plan) which is the advantage for us.

To setup this plugin, just follow the following simple steps.
- Install UpdraftPlus from plugin section,
- Activate the plugin,
- Enable backup for everything on your site from settings option for UpdraftPlus,
- Authorize access to Google drive,
- Create a Backup,
If you are not sure about the setup process, you can simply check our guide on how to backup wordpress site on Google drive.
Step 3 : Add the Domain to New Host
If your domain is not already added to you new hosting, it is time to add it. If the domain is already added while buying hosting you can ignore this step.
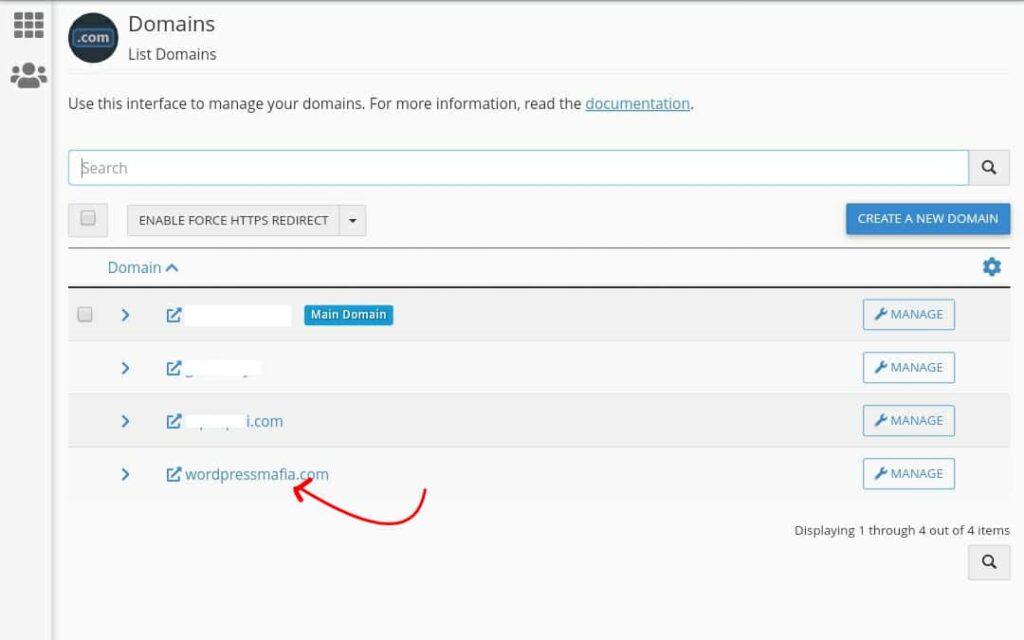
In this step, we do not recommend to make any changes to your DNS records (such as nameservers and A record). To minimize the down time, we will do this later.
Step 4 : Install WordPress on New Host
Open your new server and install a fresh WordPress on your domain. You can install WordPress either using auto installer or you can also install WordPress manually.
This installation does not require any changes in terms of name, tagline, user, database, etc. It will get replaced by one which is currently bing backup on Google drive on another server.
You can install WordPress even without pointing domain to the server. So, by doing that, you will save few minutes of down time.
Step 5 : Change DNS Records (Nameservers or A Records)
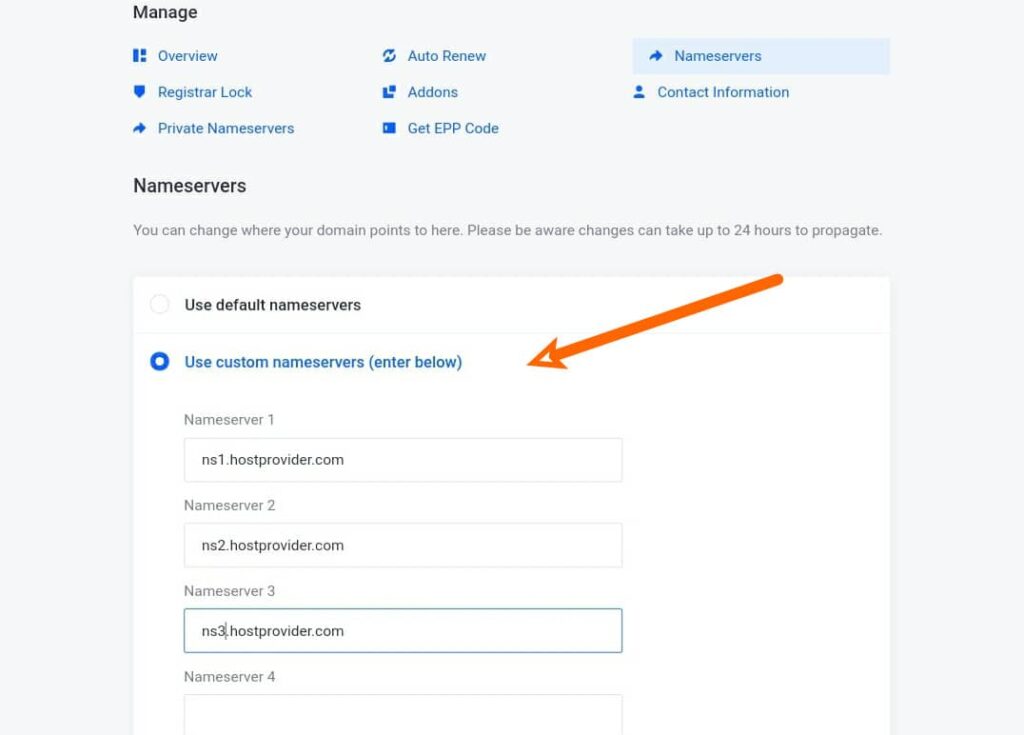
Now, you can change the nameservers or A Records from the DNS manager to your new host. But, make sure that the site is completely backed up to Google drive and ready for restoration.
To change the nameservers, go to your domain registrar’s site and login to your account. Find the nameserver option and change the nameserver to new hosting.
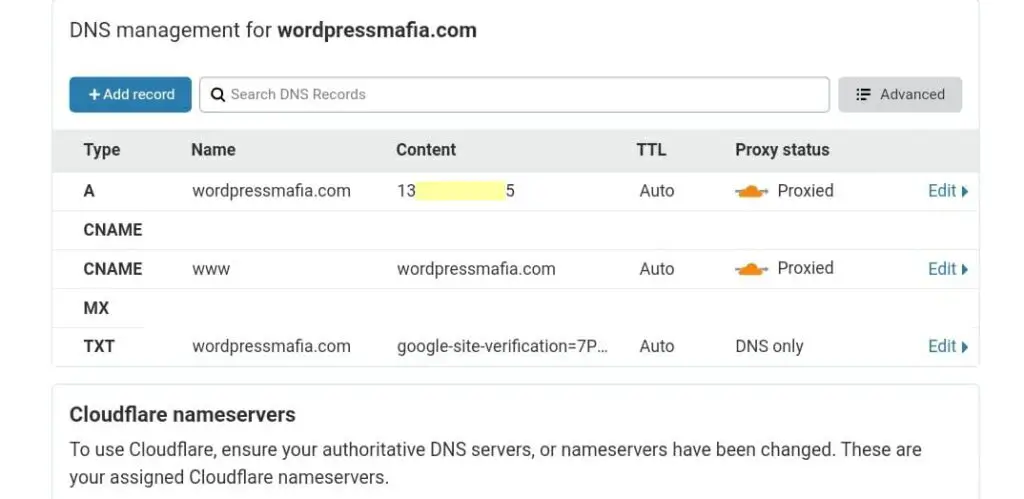
If you are using CDNs like Cloudflare or other DNS manager, you can simply use A record that points to your server IP and one CNAME record for www subdomain.
Your server IP can be found on cPanel at the sidebar labelled as Shared IP in case you are using shared hosting.
Step 7 : Login to WordPress
The DNS propagation generally takes a few minutes to few hours which you can check by using online dns checker tools. Once the domain points to new host, go to your site’s login page and login using the new username and password given for the new installation.
If you don’t remember the password, you can login without password if you follow the login link through the cPanel. The login url can be found under the WordPress Installer.
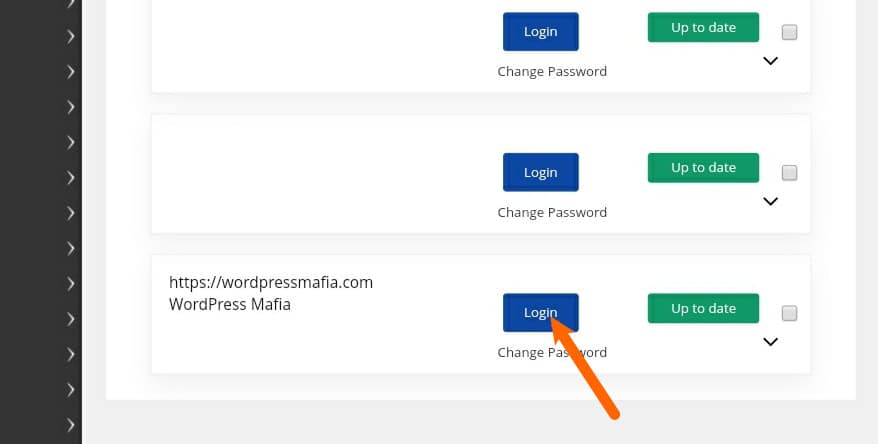
Step 8 : Install and Activate UpdraftPlus Plugin
After logging in to your WordPress dashboard for your new installation, go to plugin option then install and activate the UpdraftPlus plugin.
You can simply ignore everything such as your theme sets of plugins and other custom settings you had on your previous server. We will restore everything the original site using restoration feature of UpdraftPlus.
Step 9 : Authorize UpdraftPlus With the Same Google Account
This step is similar to step 2. You have to enable backup setting on Google drive and authorize access to UpdraftPlus.
Make sure that you authorized the same Google account which you authorised in your old hosting. You can also authorize another account, but you will need to download the backup file from another and upload them to server manually.
After doing that, return to backup/restore tab. A new backup of newly installed site might run immediately which you can cancle.
Step 10 : Scan Google Drive for Backup Files
Under Backup/Restore tab, you will see Rescan remote storage option which will scan all the backup files that your drive has. This will include backup of other site, if you have authorized for any.
Alternatively, you can also download the backup files from your Google Drive to local storage and upload all of them to your site using upload backup files option. Whatever option you choose, it is possible to migrate WordPress site to new host using both methods.
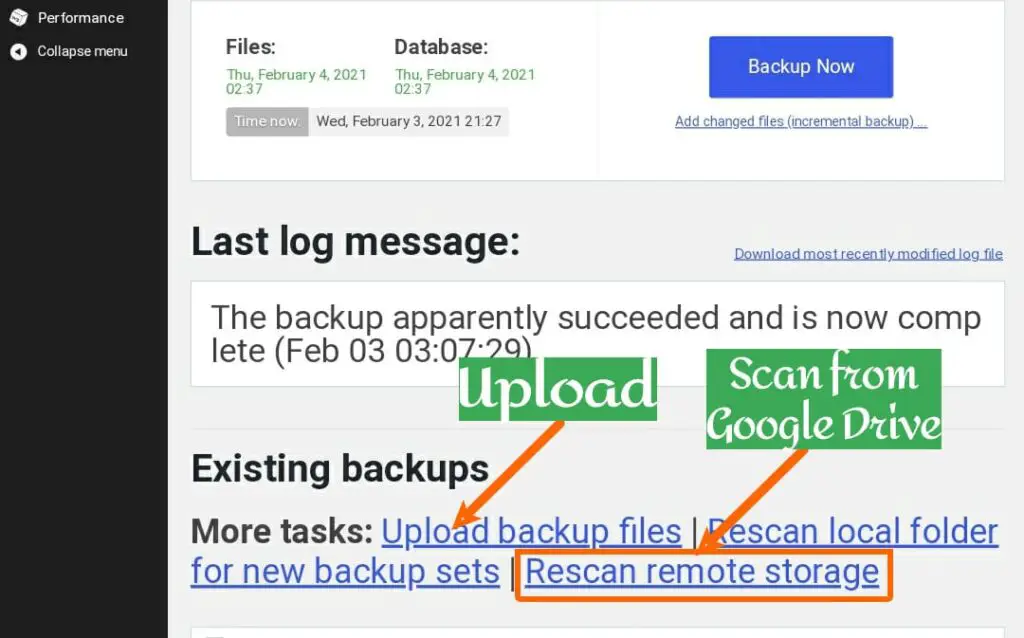
If this contains mixed (multiple sites) backup files, identify the correct one by looking at the time of backup. You can make it sure by checking if the next site was backed up recently.
If you are not sure about it, you can check UpdraftPlus folder inside the google drive and download the recent backup files which contains the site name as file name.
Step 11 : Restore Backup File – Migrate WordPress Site to New Host
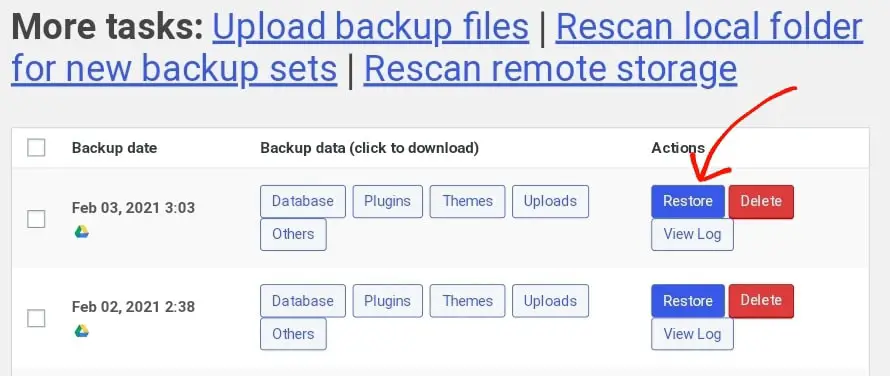
After identifying the correct file, you can click on the Restore button located alongside the most recent backup file.
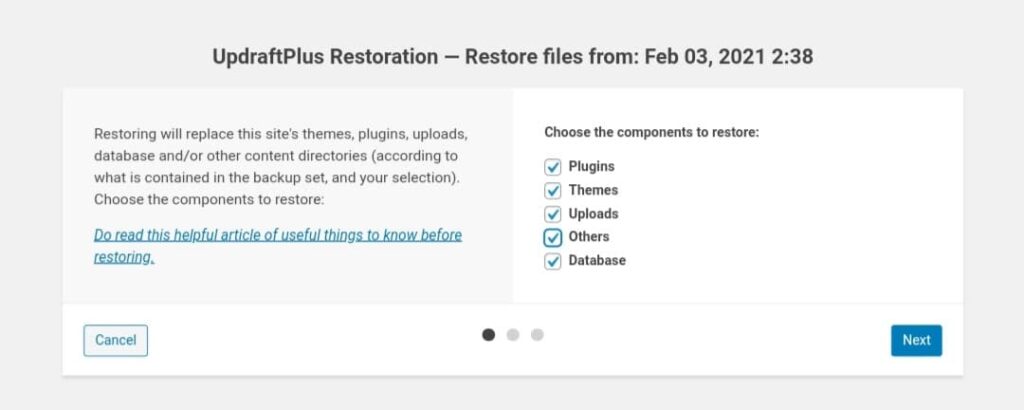
When you click on the restore button, a new page will appear. The new page will show what do you want to backup. This includes Templates, Plugins, Uploads, Database and other files. Select all the options as we have no intention to restore files partially.
When you proceed further, it will start downloading all the files from Google Drive. If you have uploaded the files instead, this step will get completed very fast.
The download process takes a few minutes to hours depending upon your site size and type of hosting plan (I/O limit), etc.
Once the download process gets completed, you can restore the site. The restoration process takes few minutes to get completed. After the restoration process ends, it will require you to login to your dashboard. The login credentials will be the same as the old.
And finally, it asks you to delete the old directories (just previous Installation). After deleting the old files, your site is now ready on new host.
Wrapping Up – How to Migrate WordPress Site to New Host
After following all the steps you will be able to migrate WordPress site to new host. We do not recommend to immediately delete the site files from the previous host. You should keep them least for a week to make restoration in case you have done anything wrong.
Kudos! You have successfully migrated your WordPress site to new host.
Frequently Asked Questions Across the Web Regarding How to Migrate WordPress Site to New Host
Should I Migrate WordPress Site to New Host Manually or Using Plugins?
We always recommend to use manual method to migrate WordPress site. Because in manual installation, there will be no down time. If you are less techy, you can do it by using plugin which is generally possible with around 10 minutes of downtime.
How do I Migrate WordPress Site to New Host Manually?
You can migrate WordPress site to new host by downloading all the files from your WordPress installation directory and the database related with it. After downloading the files, you will need to upload the same on the new host and restore the database file.
Do I Need to Migrate the Domain to New Host Along With the Site?
The domain and hosting are totally different from each other. It is not necessary to have the hosting and the domain from the same seller. You can keep the domain on the existing registrar and only migrate WordPress site to new host.
However, if the domain was purchased together with the hosting, you can transfer the domain to new host for easy management.
How do I Migrate WordPress Site to New Domain?
Migrating to new domain is again an easy task. You can simply migrate the WordPress site to new domain host following our above step by step guide on the different domain and change the installation url from WordPress setting and database table.
Can I Migrate Site From WordPress.com to Self-hosted WordPress?
You can migrate WordPress site to new host (from wordpress.com to self hosted WordPress) but the idea behind it is not as easy as it on self hosted platform.
Does Changing Website Host Affect SEO?
Migrating WordPress site to new host does not affect on seo unless and otherwise the files are misplaced and appeared in different manner or the server new server responds at comparatively longer time or the site gets down for longer time.
How Long Does it Take to Migrate WordPress Site From One Host to Another?
There is no any defined time that one can declare. When you migrate WordPress site to new hosting, it generally takes 10-15 minutes. However the time varies on the basis of size of the site, type of server, method of migration, I/O allowed to your plan, etc.
What is the best way to migrate WordPress site to new host?
The best depends upon the level of knowledge the owner has. Manual method is the best as it can be done with zero downtime.
Migrating the site can best using plugin if you can consider a little bit of downtime.
Discover more from Grisma Blog
Subscribe to get the latest posts sent to your email.