Did you know that it’s possible to connect any domain, including those with the .np domain with Blogger? If you want to connect a .com.np domain, you must use a DNS manager to add CNAME records. These records allow you to associate your domain with a specific server or service.
We know that our .np domain registrar doesn’t offer DNS management, therefore you have to use a third-party option like Cloudflare to handle it for you. Once you’ve added the necessary CNAME records, you’ll be able to use your .com.np domain with Blogger.
There are multiple DNS management options available in the market, and Cloudflare is one of them. In addition to providing DNS management, Cloudflare also offers several other useful features.
Some of these features include content delivery network (CDN) services, web application firewall (WAF) protection, and DDoS mitigation. By using Cloudflare or another DNS management service, you can easily connect your .com.np domain to Blogger and take advantage of these additional features.
Table of Contents
Step-by-Step Guide To Connect .com.np Domain with Blogger
The following is a step-by-step guide to adding a custom .com.np domain with a blogger site using Cloudflare for DNS management. I am assuming that you already own a .np domain.
Connecting a custom domain to your website is a simple process that involves a few key steps. In this guide, we’ll walk you through each step in detail, so you can easily connect your domain and start using it with your website. Whether you’re new to the process or just need a refresher, this guide will help you get your domain up and running in no time. Let’s get started!
Step 1: Create a BlogSpot Blog
To get the .np domain hosted on Blogger, you must have an existing Blogger blog. And I guess, you probably have one. If you do not have one, please follow these instructions to create your free blog.
To create a Blogger blog, you’ll need to have a Google account. If you don’t already have a Google account, you can sign up for one by visiting the following URL: https://accounts.google.com/signup Once you have a Google account, go to the Blogger website at the following URL: https://www.blogger.com.
On the Blogger homepage, click on the “Create your blog” button. On the next page, you’ll be asked to choose a title and address for your blog. The title is the name of your blog, and the address is the URL that people will use to access your blog. Next, you’ll need to select a template for your blog. Blogger provides a variety of templates to choose from, so you can find one that matches the look and feel of your blog.

Now you have a blog with an example.blogspot.com site address. Now you will be able to connect your .np domain with Blogger and replace whatever subdomain you have started your blogger blog with.
Step 2: Make DNS Manager Available for Connecting NP Domain with Blogger
For your information, the blogger requires you to add two DNS records (CNAME records). To update CNAME records, you will need a DNS manager which the domain registrar generally provides. But, in the case of .np domains, the registrar does not provide any DNS management options for managing CNAME, A records, or any records except the most basic DNS record i.e. nameservers. Therefore, we must use this system from a third-party DNS manager.
Add Your .Com.NP Domain in Cloudflare
There are multiple ways to manage DNS records. Among these options, managing DNS through Cloudflare is easy, quick, and efficient. So, let’s get started on how you can do it with Cloudflare.
To add your domain to Cloudflare, perform the following steps.
- Create an Account on Cloudflare
- Verify Email Address
- Add your .np domain from the Add a Site button
- Select Cloudflare Free Plan
After that, it will scan for existing DNS records. You can continue to save these records if you were previously using this domain on other platforms. For the new domain, there will be no records.

Point the Nameservers to Cloudflare
After adding the domain to the Cloudflare account, it instructs you to remove the existing nameservers and point to the nameservers provided by Cloudflare for your particular account. The nameservers provided by Cloudflare for each account are unique and look like the following samples.
- amos.ns.cloudflare.com
- duke.ns.cloudflare.com
The bold part varies for different accounts and others remain the same.
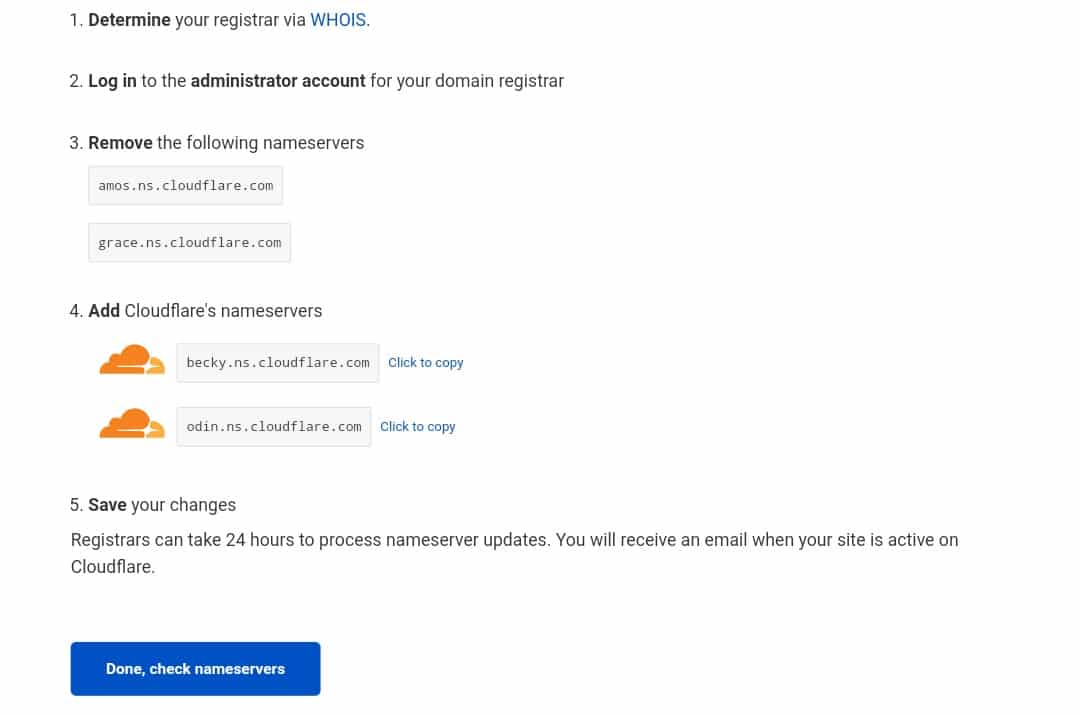
To change the nameservers from your .com.np registrar, follow the instructions below.
- Go to register.com.np and log in to the account from which you have registered your .np domain.
- From the Menu, go to the Dashboard. There will be tabs for Active and Pending domains.
- Click on the desired .np domain.
- Now, click on Change DNS setting
- Add the nameservers as provided by Cloudflare and save them.
Nameserver change requests will be processed by the registrar every 24 hours from 4:00 p.m. to 5:00 p.m. Once the nameservers are updated, they propagate within an hour. To make sure that your domain is pointing to Cloudflare’s nameservers, you can use the nameservers checker tools available online such as dnschecker.org.
Step3: Add Custom Domain on Blogger to Host .np Domain with Blogger
Now, to initiate this connection, you have to tell Blogger that you want to use your domain name instead of the Blogspot subdomain in your blog. The custom domain-adding process is very simple. To add a custom .np domain with Blogger, follow the steps below.
- Go to Blogger, and select the Blog you are willing to add your custom domain.
- Go to Settings find the Custom Domain setting under the Publishing heading option and click on it.
- Add your custom domain in the text input field.
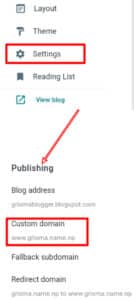
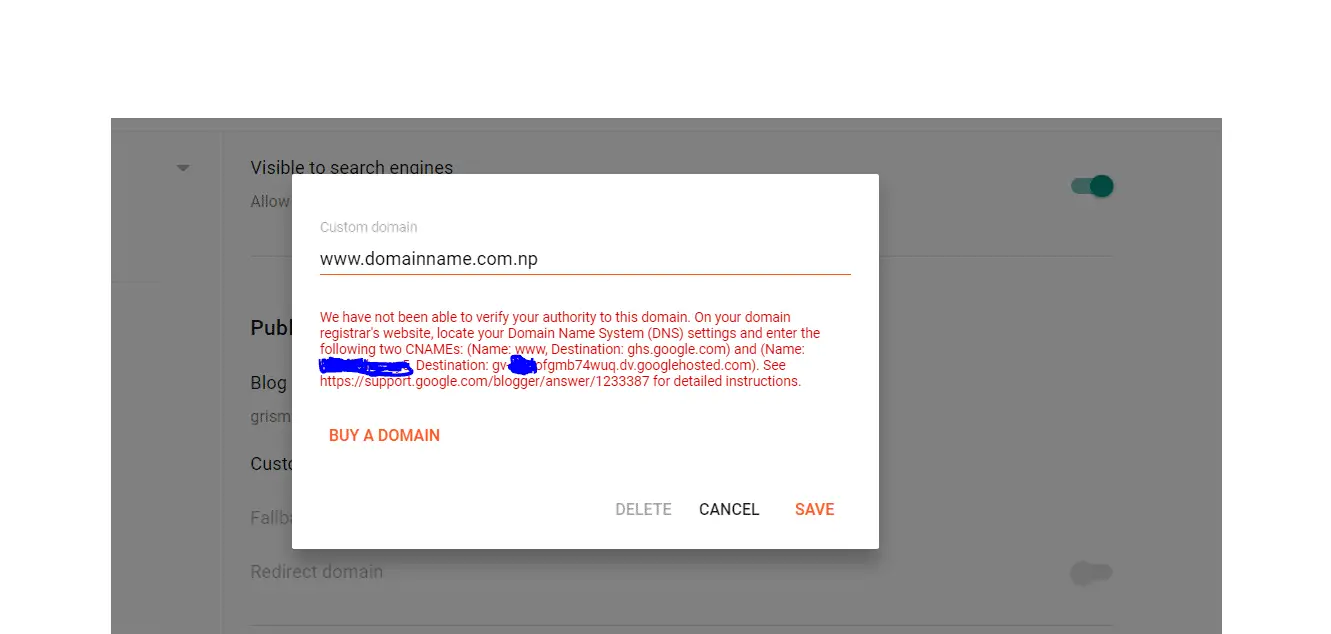
Make sure you are adding a domain with www and without HTTP or HTTPS. For example, if your domain is example.com.np, then the custom domain you entered in the blogger must be in the form of www.examle.com.np or blog.example.com.np or eng.example.com.np, etc. In short, bloggers only accept subdomain forms. Then it should look like in the following image.
After adding the domain in such a way, this popup shows a message that requires the user to add two CNAME records from the DNS manager of your domain. One of them will always ask you to point to ghs.google.com with the name: www or whatever you have chosen in place of www in the www.example.com.np form.
Step4: Add CNAME Records from Cloudflare to Connect .np Domain With Blogger
Now it’s time to add CNAME records as required by Blogger. To add these records to the DNS manager follow these steps.
- Go to dash.cloudflare.com and log in to your account.
- Click on the desired domain
- Then go to the DNS menu and click on the [Add record] button.
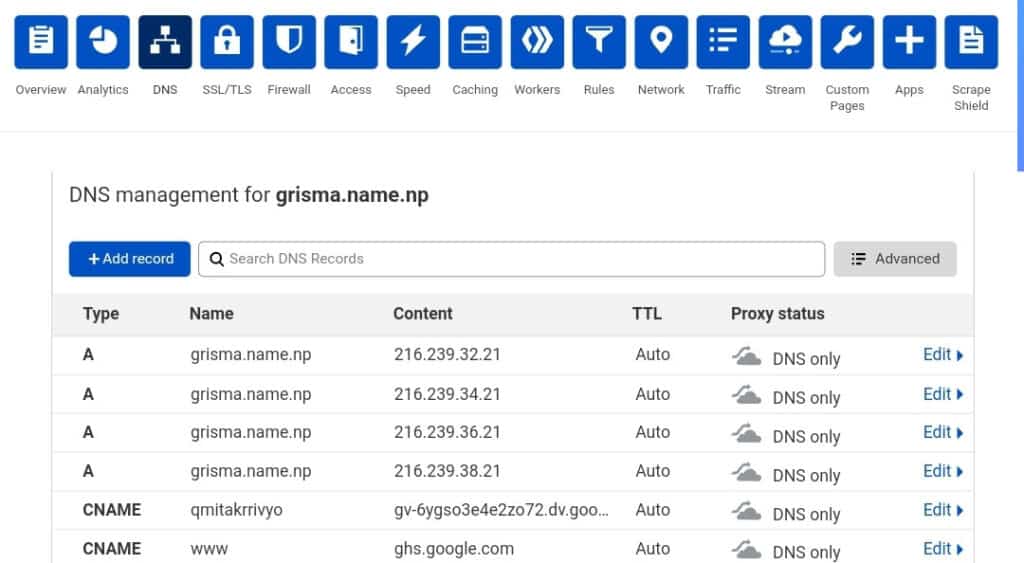
After you click on the Add record button a drop-down for the “Type” of DNS will appear, select CNAME from the dropdown, and in the Name field type www, and the Target field type ghs.google.com.
While adding the records, there will be a toggle to enable or disable the proxy. I recommend you enable the proxy so that you can use other features provided by Cloudflare.
Similarly, add another CNAME record using the name and destination provided by the blogger in the error message which is unique for every domain.
After saving CNAME records, wait for a few minutes and save the domain, or come back after a few minutes on Blogger and add the domain and you will be able to save the domain without getting an error message.
Do not worry, sometimes, it takes up to 24 hours for the domain to work with Blogger.
For simply connecting the domain, you will not need to add any additional records.
Step 5: Redirecting Naked Domain to Blogger (Recommend)
A naked domain means the domain in the form of example.com.np. In the above setup, our domain is connected to Blogger as www.example.com.np. It means it will not be accessible if the visitor only enters the naked domain. Therefore, it is necessary to redirect to the www version.
There are three options you can do to redirect the naked domain to the www version of Blogger.
Using A-records and HTTPS Setting of Blogger
Blogger suggests adding these four IPv4 addresses as A-records to make it possible to redirect non-www traffic to www or any subdomain you have added in the blogger. To add these records in the name field you have to put your domain and IPv4 as the destination. The IP addresses are:
- 216.239.32.21
- 216.239.34.21
- 216.239.36.21
- 216.239.38.21
To enable such redirection, go to Blogger’s settings. Under “Publishing” you can find the Redirect domain setting, just enable it. This will take a few minutes to work and you are done. Now you can access your blog from both the www and nonwww versions.
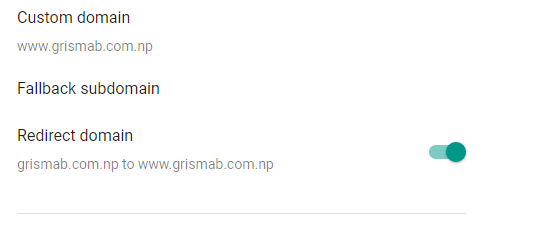
Adding CNAME Record (recommended)
Instead of adding four records and enabling them from Blogger Settings. I recommend you add a CNAME record in Cloudflare.
- Go to the DNS manager
- Add a CNAME record
- Enter ‘@’ or full naked domain in the Name field
- Enter www.@ or www.example.com.np in the destination field with proxy enabled if you have enabled it in other records.
Now, your naked domain will redirect to the www version.
Additionally, you can also use Cloudflare’s page rule feature to redirect non-www to www.
Step 6: Using HTTPS (Optional but Highly Recommended)
Having SSL encryption is essential on any site. It is hard to rank a site in Google without HTTPS protocol enabled.
It is highly recommended to use HTTPS protocol. In blogger, there are two possibilities for implementing HTTPS.
If you’re not using the proxy in CNAME records
If you have not enabled proxy while adding the CNAME records this method is for you. Blogger allows free SSL-secured protocol for every domain or subdomain made with Blogger.
Here is the process to enable HTTPS with Blogger
- Go to Blogger settings for your site.
- Under HTTPS, toggle the switch to enable HTTPS for your site.
- Wait for 10-15 minutes to get HTTPS enabled for your site.
After enabling HTTPS, your site will again be inaccessible until an SSL is applied to the site.
If you are using the proxy in CNAME records
If you are using the proxy in the DNS records, you have to do a bit more setup. First, enable HTTPS from Blogger as mentioned in the previous point.
Now, do the following to set up HTTPS in case of proxied CNAME records
- Go to Cloudflare Account
- Select the domain
- Go to the SSL/TLS tab
- Choose the Full (strict) option in SSL encryption mode.
- Then go to the Edge certificate tab
- Toggle the switch in always use the HTTPS option

Congratulations! Now You are on Blogger with your custom .com.np domain connected with Blogger and HTTPS and www redirection enabled.
Frequently asked questions connecting .np domain with Blogger
Can I host a .np domain with Blogger?
Yes. You can connect any domain with blogger including .np domain extensions. You will need a DNS manager to add the required CNAME records and a BlogSpot blog
How can I connect the .com.np domain with Blogger?
- Create a BlogSpot Blog
- Add .com.np Domain to Cloudflare Account
- Point the Nameservers to Cloudflare
- Add Custom Domain on Blogger to Host .np Domain with Blogger
- Add CNAME Records to Connect .np Domain With Blogger
- Redirecting Naked Domain to Blogger (Recommend)
- Use Secure Connection (HTTPS) for the connected .np domain with Blogger
Is Cloudflare Free?
Cloudflare includes free as well as paid plans. You can use the free plan for up to 50 domains. The basic features will be free forever.
Very nice aritcle.
Thankyou because of i am able to register domain.
Thanks bro
aba custom email kasari create garne?